Restoring a 1962 Jaguar E-Type

December 31, 2007

New year’s resolution

Filed under: 1962, auto restoration, car restoration, E-Type, Jaguar, XK-E, XKE — Penforhire @ 10:25 am

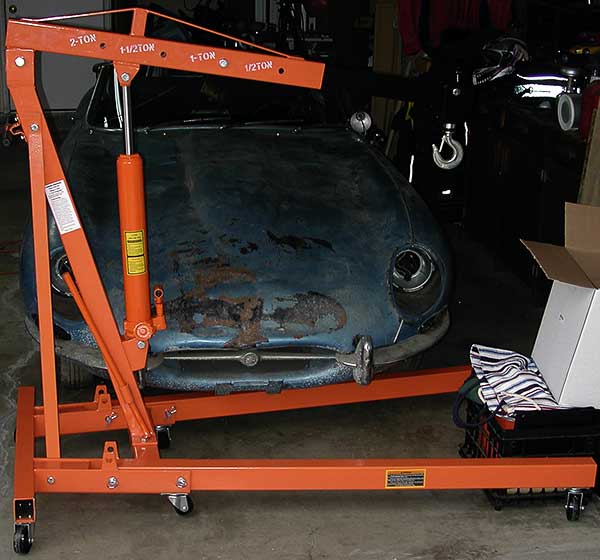
Where were we? Oh yeah, I wanted to remove the left rear bumper. And one thing leads to another.

The fuel tank has to be removed to access two of the three bolts holding the bumper. Absurd, but the tank has to come out anyway. To get the tank out I have to finish disassembling the boot and the boot lid is hanging in the way. Maybe it needs new springs but it doesn’t hold open firmly.

So… off comes the boot lid.

2482-boot-lid.jpg

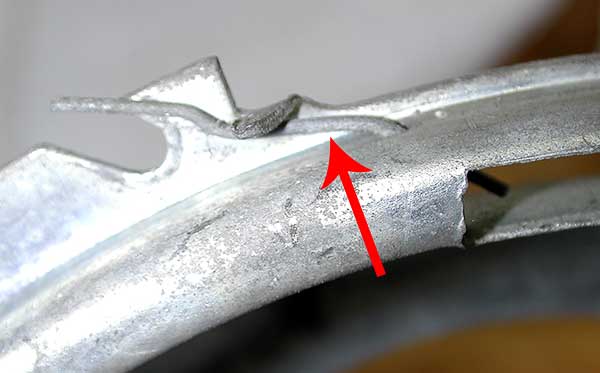
Here is the latch mechanism on the boot lid. It has an odd stack of shims, probably to place the latch precisely.

2484-boot-latch-shims.jpg

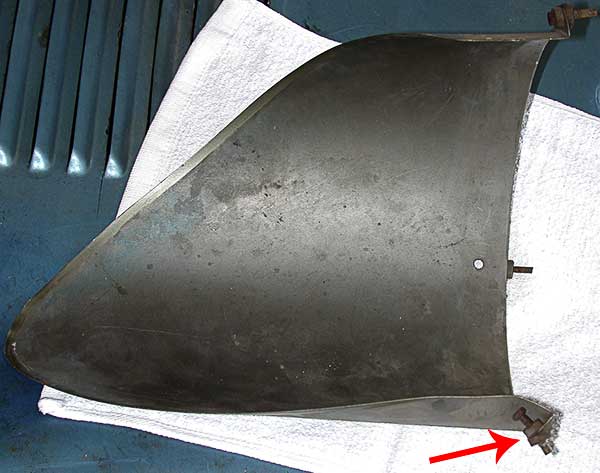
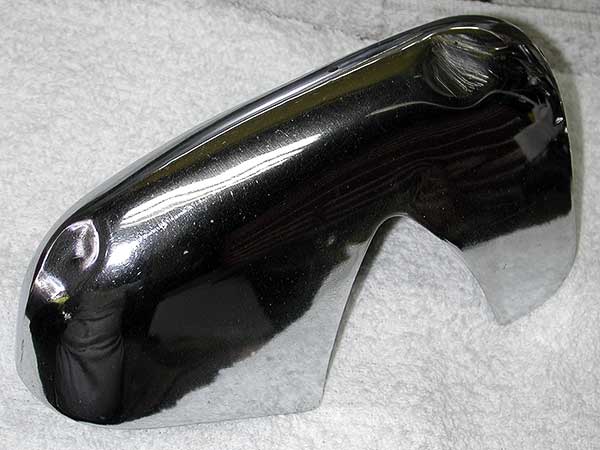
The boot rubber seal has the consistency of cardboard now. I pulled it off as it seems to be held in place only by old glue. The boot lid is more evidence of the heavy gauge of sheet metal used back then. This thing is heavy! An aluminum or carbon fiber boot lid would save noticeable weight. I can’t believe how light the aluminum body racing cars must have been if THIS car is around 2800 lbs.

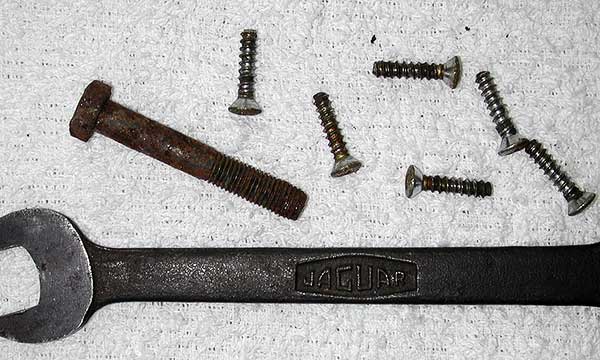
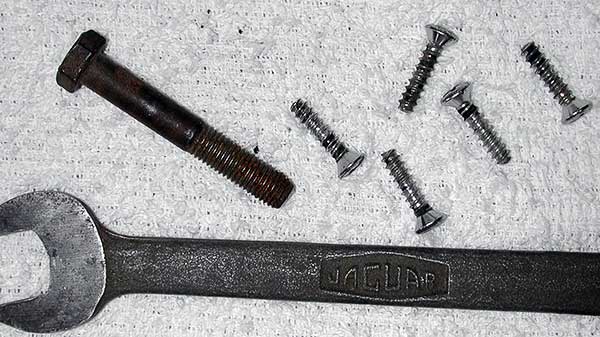
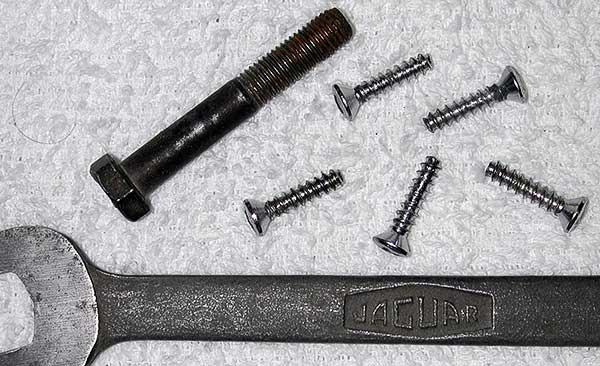
The boot interior has false “walls” on the left, right, and rear. These are each wedged into position, held in place by several small screws.

2485-left-side-of-boot-interior.jpg

These look like leather but may be veneered cardboard. Or does solid leather age and separate like cardboard?

2486-left-side-boot-liner.jpg

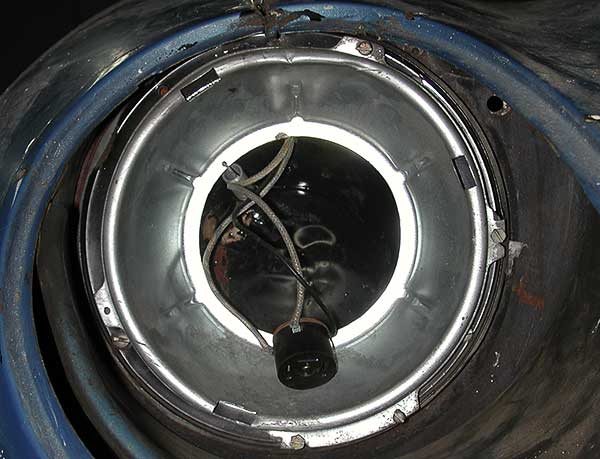
Here is the fuel level sensor mounted on top of the fuel tank.

2487-fuel-level-sensor.jpg

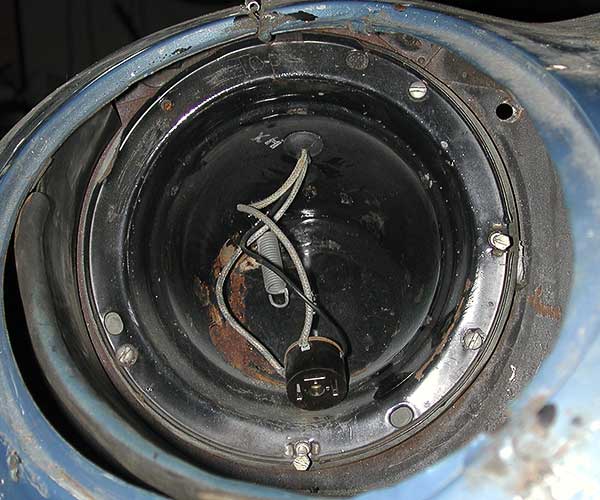
Here is the lid of the fuel pump, also on top of the fuel tank.

2488-fuel-pump-lid.jpg

You would think that removing all the bolts would free these to be extracted from the tank. That would be true in my ideal world. But where I live, on my planet, where my father-in-law left a full tank of gas sitting for decades, the gas tank turned into a mostly solid geode-like rock. I had to rip and tear the fuel pump and level sensor out of the tank.

2493-fuel-pump-level-sensor.jpg

Here’s a close-up of the fuel pump.

2494-swamp-thing.jpg

Nasty! Like the creature from the black lagoon. I had no idea there is that much solids content in gasoline. It smells worse than ordinary gasoline, hazardous, like it already gave me cancer. I took it to work to gross out some co-workers. The first thing that crossed my mind was this might be one of those things where instead of cleaning some of it up to re-use, I just call up a parts desk somewhere and order a whole new widget.

I haven’t gotten the tank out yet but some folks are thinking it may be a lost cause too. Anyone know what to clean this up with? It’d take a lot of expensive carb cleaner! Maybe mineral spirits or ?

For the new year I resolve… never to let a full tank of gasoline sit for decades. Shouldn’t be too hard to do eh?

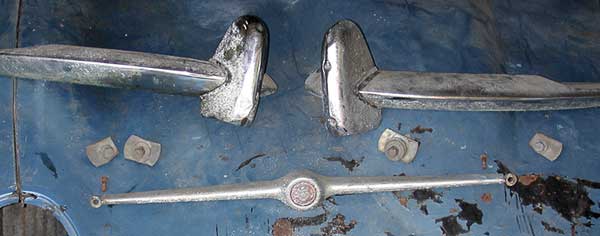
I cleaned up the level sensor and took a closer look at it. It was not technically sealed. Undo two screws and the lid pops off.

2495-level-sensor-opened.jpg

By examining the contacts I deduce that this must operate in rheostat mode (as opposed to a voltage divider). Gary says all old level sensors worked this way. I spent some time with this sensor because it is very close to the potentiometric sensors I do engineering around for a living (wirewound, conductive plastic, and cermet elements).

The nonlinear wirewound element and wiper are in excellent condition.

2498-sensor-rheostat.jpg

I don’t see fluid residue inside here but there also was no gasket or similar seal on the sensor lid?

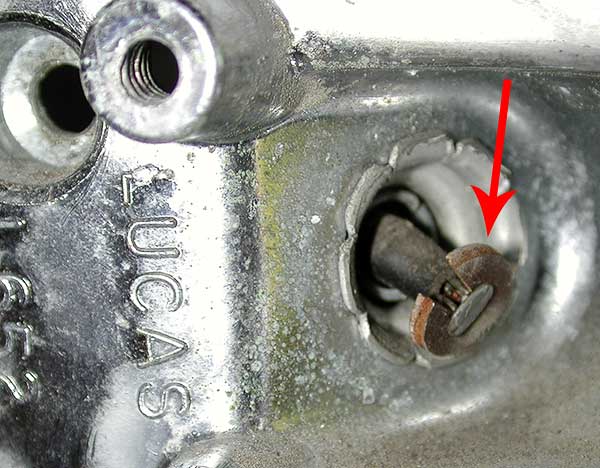
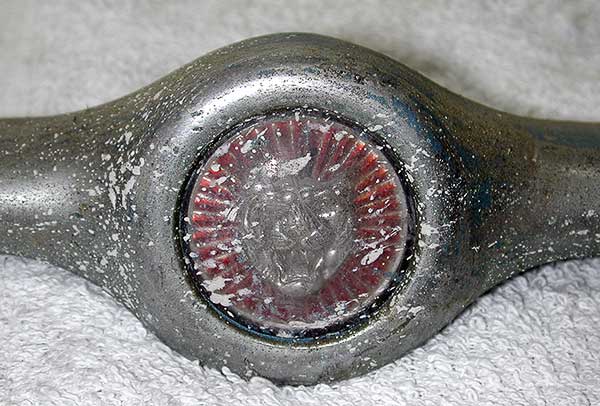
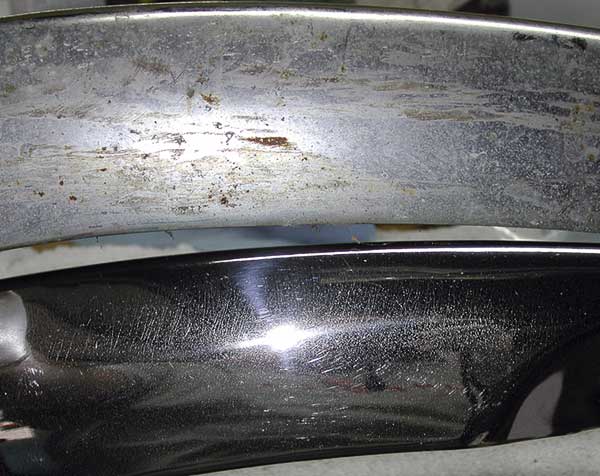
The lid has a “collector” piece riveted in place. It looks like a bar of plain copper but maybe it was plated with something. It shows heavy wear at the full-tank position, where it probably spent most of its life.

2496-sensor-collector.jpg

Since the signal is conducted through the metal lid I find it odd that they riveted a separate part onto the lid. Why not collect the signal onto a one-piece lid? Maybe the materials were less expensive this way. I may need to buy a new sensor because the float pivot is sticky, the float itself is corroded, and the collector is worn.

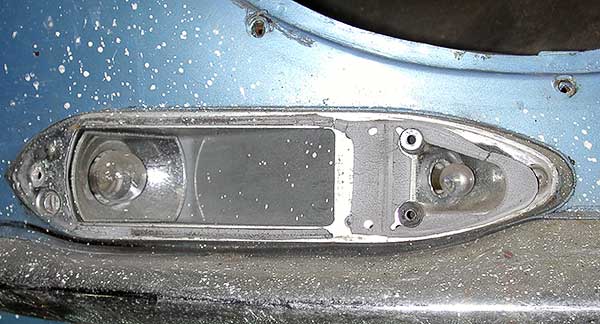
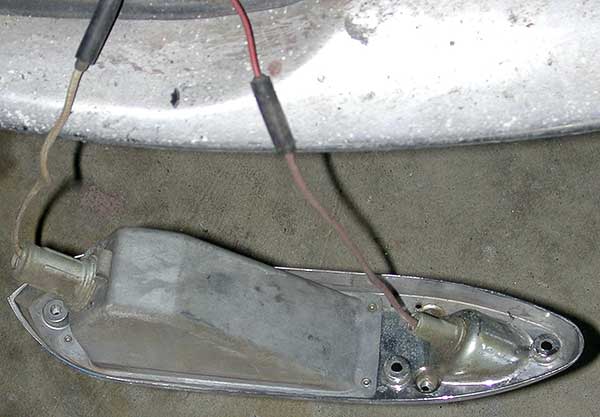
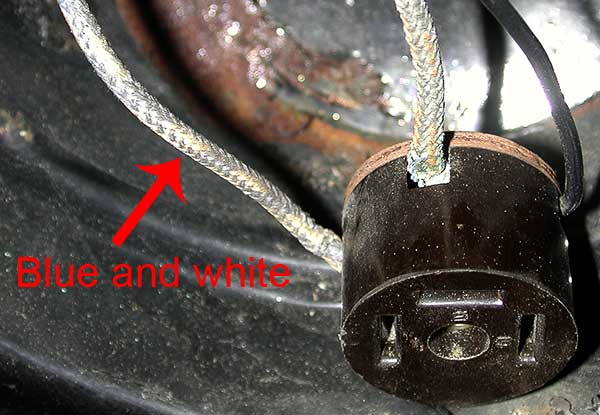
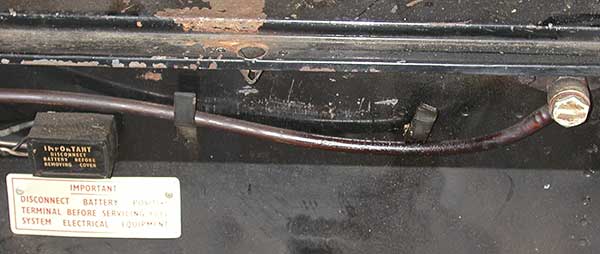
Back to the boot. The electrical connections to the fuel pump run through a rubber box at the back wall of the boot.

2489-fuel-pump-electrical-connection.jpg

This must be a method of reducing fire potential during servicing? Inside the box are two insulated junctions.

2492-fuel-pump-bullet-connectors.jpg

The these are unions. The wires all end in “bullet” type connectors that snap into the union ends. Seems like a lot of effort to move the spark potential only a foot away from the gas tank?

Here’s the rest of the fuel pump output run along the back of the boot.

2490-fuel-line-in-trunk.jpg

I haven’t taken apart any of the banjo bolts yet. They look guaranteed to leak after disassembly!

The fuel filler is on the left side of the boot.

2491-fuel-filler-neck.jpg

I had to remove the cardboard wall to get to it. There are two hose ordinary clamps holding a short rubber tube between the filler neck and the tank neck. Better make sure those seal properly when I reassemble or else every time I fill the tank I’ll be leaking gasoline into the boot!

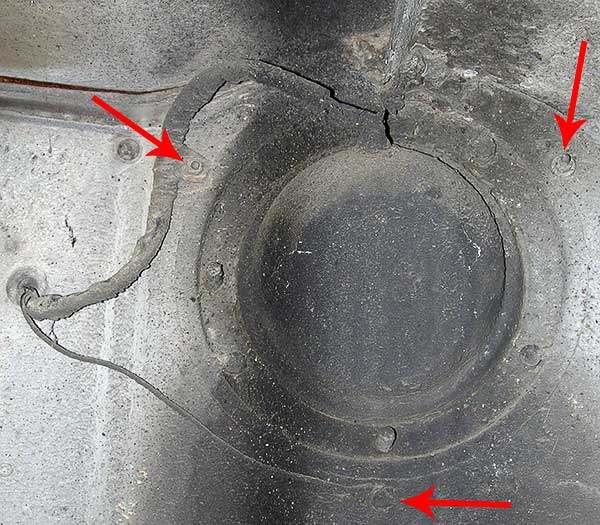
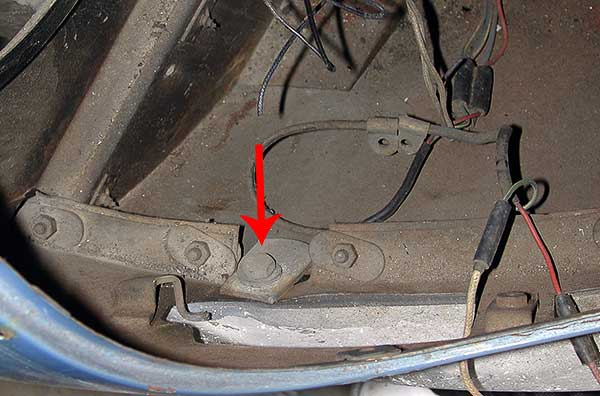
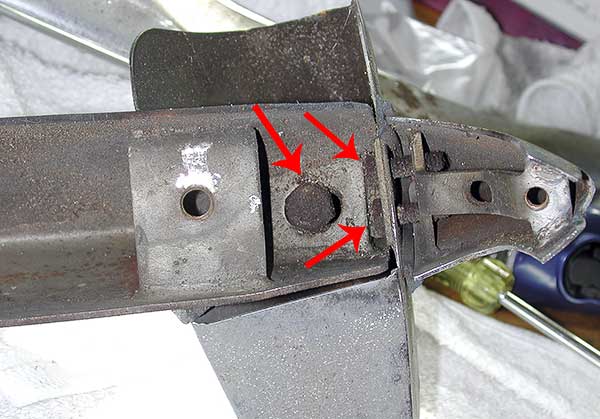
According to my repair manuals I’m down to just three bolts holding the gas tank to the floor of the boot.

Oh yeah, my beer was a smash hit at the holiday family gathering. I’m almost out so I must schedule another brew wort ASAP, a German-style weizen (wheat beer) this time. If I can only shake my holiday cold. Seems like I catch one every year from some random family member. I had to pass on a classic motorcycle gathering in Pasadena this morning that Gary went to. The BMW /5 would have fit in nicely! See you next time in 2008.

December 9, 2007

Excuses

Filed under: 1962, auto restoration, E-Type, Jaguar, XK-E, XKE — Penforhire @ 2:48 pm

Everyone has them. But I took photos to prove it.

Let’s see. A week ago I went to the largest car swap meet I ever saw, put on by George Cross and Sons held eight times a year at the LA County fairgrounds in Pomona. I had no idea how big it was. Some of the hot rodders at work suggested it and I should get there early (show runs something like 5:30 to 11 AM). So here I am, driving into the lot at o-dark-hundred (5:30 or so), temperature in the high 40’s degrees F (!), wondering why the heck are dozens of other cars doing funneling through the gates of the parking lot with me?

Naturally it still is dark and I have no idea even where the ticket gate is. Fortunately I just had to follow the crowd. After I buy a ticket and enter the show I still have no idea where anything is. All I can see is a “main street” that extends as far as I can see and everyone is walking toward the far end. I see side rows of campers but with no lights I can’t tell if I am supposed to walk down into these dark alleys.

I’m humping along for twenty minutes or so and it is starting to get light just as I reach the car entry gates on the OTHER side of the whole fairgrounds. At this point I realize, yes, all those rows I passed are filled with people selling stuff!

The advertising for the show claimed seventeen miles to walk! I thought they were kidding. No, I think they were right. I was pooped after three hours of walking and I figure I saw 1/3rd of the show. There were parts and tool vendors for just about anything you could imagine. As long as it was an American machine and preferably Chevy.

I wondered why EVERYONE was pulling a big red wagon around. Until I noticed I was maybe a mile or more from where I parked and I might want to buy something heavy, like an engine.

Here’s an example vendor. That symbolizes what I’m talking about.

2460-2-tranny-yokes-only.jpg

This guy is selling nothing but transmission yokes. How specialized is that?! There were folks walking around wearing sandwich board signs like, “I need parts for a 1962 Cadillac.” I suppose that’s a good way to make connections at the show.

Anyway, I tried to take photos showing the enormity of the show but I failed to capture the “lost on another planet” feel of it.

If you want to buy a hot rod go to this show! There were more mean machines for sale in one place than I could have imagined. In no particular order (I got jaded staring at literally hundreds of fine vintage machines) —

2460-3-just-one-of-hundreds.jpg

2460-4-woody.jpg

2460-7-coupe-for-sale.jpg

They had entire parking lots dedicated to specific breeds and/or years of car for sale and for show —

Here’s the Corvette lot, still filling up because it was early.

2460-1-corvette-parking.jpg

Here’s pre-1975 VW’s —

2460-5-pre-1975-vws.jpg

Here’s the Porsche lot —

2460-8-porsche-parking.jpg

Those lots were unusual because they represent foreign cars. Multiply that by ten and you get the domestic lots (this one just starting to fill) —

2460-9-just-another-row.jpg

2460-6-more-noses.jpg

Well, I did not find any Jaguar parts. I did buy some Wenol metal polish and assorted small tools, like a rod saw (grit-on-rope). I spotted vendors selling used Craftsman tools and noticed new Gear Wrench prices about half the lowest price I can find on e-bay.

I also talked to a couple of local chrome plating shops. For one shop, I spoke with the owner’s son because the owner doesn’t speak English. Hey, they’ve probably got the right labor rate for me! Another shop just does bumpers. None of my other trim, just bumpers.

Oh why couldn’t I pick a 1950’s Chevy to restore? Freshly rebuilt engines were overflowing at the show, running maybe $1,800 to $3,000. Hoit rodded engines with monster blowers on top (and engine dynos north of 700 HP) still cost less than a specialist stock rebuild of the XK motor. Sigh.

Quite a show. I need more excuses for not showing progress right? How about bottling my beer into 22 oz bottles (why mess around) and making up fancy labels?

2465-bottled-beer-or-cat-piss.jpg

I don’t know if it is beer or cat piss yet but I will in two weeks. Sure smelled good in the bottling bucket and it tasted okay (for “green” beer).

Not enough excuses? How about, my stepson got married? From the printed invitations —

2467-brians-wedding.jpg

Did you know the parents of the groom have to buy the rehearsal dinner? What a crock! Could be worse. The parents of the bride paid for a formal reception at Fort MacArthur and it was awesome. That is an active Air Force (used to be Army) housing base in San Pedro so they had an Air Force sponsor, I believe on Kristin’s (wife’s) side. There were about 150 guests and an open bar all afternoon! Personally I wouldn’t want to spend more for a wedding than the floral arrangements alone cost them. Call me Scroge.

And at least we didn’t have to drag our wedding present to the hall. We has already dropped off a big screen TV we got for them at their new apartment. They’ve been dating over seven years, since start of college, and are now moving in together. She works at UC Irvine so they got on-campus housing. After he passes the CA Bar exam we figure they’ll be able to afford to live wherever they want.

Funniest moment — at the rehearsal dinner Brian presented his three guys in the wedding ceremony with custom bobble-head statues. Did you know that if you take someone’s head-shot photos from the front and side you can get a molded bobble-head doll that looks like them? They were incredible likenesses. Still makes me chuckle.

Anyway, I didn’t take pictures because they had a real pro photographer covering it and my wife’s family is camera-nutty even without me. Did I ever mention that at our wedding my in-law cousins had a digital slide show of our wedding up and running at the start of our reception? Yeah, that nutty. So it was a paparazzi-fest even without me. I just wanted to enjoy it. So I have no photos to share. The pro was a busy man though. He had three cameras hanging off him and his assistant was shooting a fourth! You could tell he knew his business just from his posing directions, speed of activity, and attention to backgrounds.

The Bishop that performed the ceremony just about raised my wife’s family (and baptized Brian!) and my wife kept referring to him as “Father Joe, gasp, no I mean Bishop Joe.” And there was some to-do over my wife and I getting him gift cards for local fine restaurants because my mother-in-law thought a cash gift would be gauche. Pffft! Like there’s any difference? The ceremony was fine, except even WITH a rehearsal they forgot to light their “unity candle.” We all said they were cursed now. And what was up with the overhead speakers in that church? Brian’s voice sounded just like Michael Jackson when he said his vows.

The tables at the reception were all named for Brian & Kristin’s favorite movies. My wife’s mother was sitting at the Psycho table and we all thought that was appropriate. She only grabbed the in-law dad’s ass once. He is retired from owning his own sail-making business (you can earn a living making sails?) and quite a bit more, um, conservative than my wife’s family. My wife and I sat at The Sound of Music.

Sooooo. We’re not done with excuses. This weekend was the Cycle World International Motorcyle Show in Long Beach. BMW Joe and I go together every year. Well, this morning he had some sort of ticket snafu and I only met up with him as I was leaving the show! Gary and Italian Joe were rumored to be at the show but I couldn’t find them.

The hockey-hall was filled with custom bikes. Here’s the “V-Rex” —

2469-v-rex.jpg

How about a 1971 BMW R75/5 cafe racer.

2471-1971-r75-cafe-racer.jpg

Very bastardized and it made me feel good about the semi-originality of my 1973. This one looked the business though.

Here’s the Andreas Ducati. Very odd styling and the exposed pulleys on both sides of the bike make it look like a death-on-scarves machine.

2478-andreas-ducati.jpg

The main hall was filled as usual with the latest and greatest. Here’s a good looking trike from, I believe, a Korean company (might be Chinese).

2470-chinese-trike.jpg

Hyosung, a Korean company, is making inroads to America with their bikes. Their styling is better than some of the big boys but I’m sure we’re all wary of the first generation Korean machines. Anyone remember Hyundai’s first cars in America? Several friends in New Yourk bought them but they didn’t last one winter on their salted roads!

Paiggio’s MP3 scooter is now up to 500 cc’s!

2474-mp3-in-500-cc.jpg

This is not a trike since both wheels actually lean. Gary test rode the smaller one last year and loved it. 500 cc’s will make it a real choice for commutes here in America. I didn’t get a photo of it but there was also a fully electric MP3 at the show. I’m not sure if that is production-ready yet but the same company has a ready-to-buy electric bike (70 mile range, house plug recharge, 0-60 in 6.8 seconds, freeway capable). Too cool!

Check out the rear end on this Triump Speed Triple (mechanic’s porn, I know) —

2475-speed-triple.jpg

Those pipes are sexy and the whole white accented look was sharp to my eye.

Boss Hoss is calling me with their V8-powered barstool. No, really —

2476-boss-hoss-v8-bar-stool.jpg

That looks just dangerous enough for me to want to try it.

Here’s a close up of a Bimota Tesi front end.

2477-bimota-tesi-front-end.jpg

This is not new but is still an amazing mechanism for steering a bike. Various efforts at hub steering have failed over the years — Yamaha RADD on their GTS, ELF on a Honda (if I recall correctly), Triphonos (a fellow in the U.K.) — but they’re all neat.

The customer lots were full of stuff to see as well —

2479-bike-parking-lot.jpg

So I come to the end of this week’s excuses. Busy times.

November 25, 2007

Wooo, don’t know my own strength!

Filed under: 1962, auto restoration, car restoration, E-Type, Jaguar, XKE — Penforhire @ 1:57 pm

Perhaps you’ll place that line if I quote another from the same childhood TV show — “Allow me to introduce myself, Boris Badinov at your service.” Yes… moose and squirrel. Why does that line come to mind?

2443-oops-there-goes-a-screw.jpg

Let me back up a little. Since last episode our hero decided to remove the tail lights and rear bumpers next.

Here’s the right or passenger tail light —

2441-right-tail-light.jpg

Take off two obvious screws and you get —

2442-under-lens.jpg

Here’s more of those nutty bulb bases —

2446-more-wacky-bulb-bases.jpg

It appears the bulb toward car centerline is a dual filament, probably rear running light plus brake, while the outer bulb is a single. I’m assuming another running light but since I haven’t seen one work it could be the opposite (the double is a running light and both additional filaments are brakes).

By the way, both lenses have chips and cracks and I’ll be replacing them. Bummer. At first glance they appeared to be keepers. I’ll bet the replacements are expensive and don’t look quite right.

Here’s where I got into trouble. The rotted foam gasket under the lens hides three screws, one at the right corner and two toward the left (you can see the holes in the photo above). Those screws hold the tail light assembly to the car. The single outer screw on both sides of the car played nice. They unscrewed just fine. Those other two screws? $@+&*# !!! On both assemblies they were frozen and there is not enough exposure to get penetrating oil on them. Time for my impact screwdriver.

As some of you already know, hammer operated tools rate among my favorites. But that never stops me from pounding my hand a few times too. Ouch. Well, one of the screws snapped after turning a few times and you can see that in the photo at the top of the page. Moose and squirrel. As near as I can tell I am just fighting rust on the threads. What made this task so onerous is the length of the screw. I don’t know if these are stock but they required something like fifteen to twenty turns before backing free of the thin straps hung across the body’s hole for the lights. Do you have any idea how tiring that is when your impact screwdriver is turning maybe an eight of a turn per whack? What I don’t get is, the thickness of the straps means they only needed four turns or so to engage completely. Maybe these were just the length the factory had handy when they got to tail light assembly? Fourty five years later it sure made my day.

Might not be stock and I’ll come back to that in a moment.

Here are the wires to the bulbs —

2447-wires-to-bulbs.jpg

Yep, those cloth colors are just as faded in person. But there are some splices you can see at the top of the photo. What’s on the other side of those splices?

2448-other-side-of-bulb-wire-splices.jpg

Hey now. Those don’t look like the OEM harness, which is cloth-covered every else so far. Well, at least I know the colors now.

I skipped over something that might explain some of the situation.

2444-is-that-bondo.jpg

See the arrow? Is that … Bondo ?!

As it happens, our Thanksgiving celebration was at the in-laws and I had a word with dad about it. A-ha! Seems he didn’t buy this car new, as I was led to believe, but rather in 1964 as a two-year-old vehicle with about 10K miles on it. He swears he did not know about the damage. It must have been from the first owner.

Oh, yeah, I still have a small length of screw stuck in that strap (seen to the right of the arrow in the photo). What am I supposed to do with that? If it sticks out I could vice-grip it but I think it snapped flush. That’s a mighty small screw extractor. I know, look on the bright side. Now I can reach the threads with penetrating oil.

But I removed the left tail light later and what did I see —

2453-left-tail-lopening.jpg

Now that looks too perfectly like the right side. Time to poke it with a screwdriver. Hmm, sort of looks like fossilized sealant, not Bondo. Maybe this is a factory job after all? I chipped most of it off and the underlying metal looks original. Did YOUR Series One have nasty goop around the tail lights?

The light housings need some serious TLC —

2456-tail-housings-need-tlc.jpg

The chrome is pitted and bubbled. They’ll be under the grinding wheel for a while before re-plating! See those red reflectors? Here’s the backside retaining mechanism, an arm held in place by two tiny screws —

2458-reflector-retainer.jpg

Here are the loose parts. There is a chunk of rubber tube wedged between the arm and the reflector.

2459-reflector-pieces.jpg

The rubber chunks appear hand-cut and are not exactly the same length. The threaded stud on the back of the reflectors is only used as a post, not engaging any threads.

That’s about all the wrenching for this episode. I tend to inject various other hobby stuff in my blogs. This is my ‘Speaker’s Corner of Hyde Park’ so to speak. So you can start yawning now as I show you a thousand slides from my trip to …

It was a busy two weeks. Last weekend I went on the Southern California Motorcycling Association’s (SC-MA,com) annual Turkey Run with BMW Joe, starting and ending at Crazy Otto’s in Acton. The roads were magnificent and we got a tour of some of our recent So Cal wildfire areas. No pictures to share this time (see my bike blog for other rides’ photos).

I need a drink. What! No beer in the fridge?! What’s a fellow to do? Make his own —

2450-time-to-brew-some-beer.jpg

Here’s the story. A few years ago I got one of those “Mr Beer”-type kits. The thing was sort of a one-step process, brewed and served in a little 3 gallon plastic fake-keg with artificial CO2 pressurizing. All the ingredients were in a single pouch and if your water was fine and you sanitized everything it was sort of idiot-proof. Maybe twelve days from shake-n-bake to cold beer. Several batches of beer tasted fine. My wife, however, objected to the space this took up in our fridge. Fine. Okay, fast-forward a few years. You might say the answer is to put a man-fridge in the garage. A “I’ll put whatever the heck I want in there!” fridge. But you also know what I’ve been up to in the garage. There was a bike restoration before this XKE and now I don’t think I have the room for a man-fridge.

Enter the pot-stirrer. My oldest friend Jamil recently wrote a book. We go back to high school and a failed business together. What book? “Brewing Classic Styles: 80 Winning Recipes Anyone Can Brew” Look this title up at Amazon.com. Buy it. It made me a better man. He got into homebrew competition some years back and achieved unusual success, two Ninkasi awards from the American Homebrewers Association, their top annual award. Some of his recipes were guest-brewed in pubs. So as a show of support I pre-ordered his book as soon as he mentioned it was in the works. About six months later it arrived in the mail.

So for that six months waiting for the book I’ve been brewing up (ha, ha) thoughts to make beer. What about the dragon-lady? Here’s my thinking.

If I brew into traditional bottles I can sneak them into the fridge and they’ll be camouflaged among the condiments. Hmm. A long Thanksgiving weekend and a visit to a home brew shop in Culver City? Time to make beer! Jamil recommended John Palmer’s “How to Brew” as an introductory text and there are on-line instuctions everywhere. Techniques vary so much I got a headache trying to reconcile them. I wasn’t able to get the exact ingredients for one of Jamil’s recipes so I’m trying a Culver City recipe, and mostly their technique, for an American amber ale — Munton’s light malt extract, three steeped grains (Chocolate Malt, British Crystal 135, and Crystal 40), three Cascade hops additions (at 0, 45, & 60 minutes/end of wort boil), and Wyeast amber ale II yeast. Here’s the yeast slam-pack.

2451-yeasty.jpg

That thing puffed up to at least 3x its original volume in a few hours, just like they said it would. Happy yeast!

So far the hard part is cleaning and sanitizing so much stuff. I had brain fade when I purchased the kettle. I intended to buy a 5 gallon pot to just perform “partial wort boil” (2.5 gallons after boil instead of five, dilute to five in the fermenter). I ended up with a ten gallon pot. Hey! It was marked in quarts. Sue me. Phew, still fit in the sink… barely! The rest of beer brewing is a big messy kitchen ballet (did I mention my wife was napping after Black Friday shopping?).

The first batch of Eric’s American amber ale is fermenting, unless I screwed the pooch somewhere. The recipe says starting specific gravity (Original Gravity, OG) should be 1.045. I measured about 1.041. Is that bad?

2452-fermenter.jpg

Bacteria can compete with the yeast and spoil the flavor. Keeping sanitized is rough in a home kitchen (with pet dander floating around) so we’ll see. Gary told me the story of his college-days “UrineBrau” (his name for it). They didn’t even use an airlocked fermentation vessel! Barbaric! Anyway, give me two weeks to ferment and then we’ll try the bottling step (batch sugar-prime to carbonate). After that give me another two weeks to see if it is beer or cat piss. Then you locals can try it. Jamil says anything that lives in beer can’t kill you…

November 11, 2007

Mechanical advantage

Filed under: 1962, auto restoration, car restoration, E-Type, Jaguar, restoration, XKE — Penforhire @ 4:14 pm

Hmm, no answer to last week’s mystery letters. I’ll have to ask the Jag-Lovers forum.

I’m still learning the best use of vibratory bowl cleaning. I think I’ve accumulated media dust in the bowl and I need to wash it out and sieve the media. What happens is when I clean bolts now, the threads get packed with plastic-like debris.

2429-vibe-bowl-thread-packing.jpg

I have to use an edge to scrape it out, like the back side of an Exacto knife blade or a proper thread-die (but very hard to turn). The debris is resistant to even steel wire brushing.

I’ve been ill this week. Just the common cold but it knocked me on my ass. Otherwise I would have gone to the LA county fairgrounds Saturday to watch flat-track dirt bike races with Brad. But it was all I could do to get any work done. I only had one agenda for this weekend, bonnet removal.

I took off as much attached crap as I could. Here are the left and right horns inside the bonnet. They weigh a few pounds each.

2431-right-side-horn.jpg

2432-left-side-horn-harness-feedthrough.jpg

You can see the backside of the bonnet harness multipin connector above the left side horn.

I found more evidence I’m not the first guy to tear into the bonnet. Each horn had some hand markings by the electrical connectors.

2435-prior-repair-evidence.jpg

The right side here has a “B” above the right terminal (black wire) and a “?” on the left. My kind of marking!

Here are the two horns. I cleaned one up as best I can but it still has some corrosion and I don’t yet know if they function.

2433-horns-only-clean-up-so-much.jpg

Inside the opening they are marked “L” and “H.” I assume they are two-tone set, high and low. Too bad Jaguar didn’t have Colin Chapman’s (Lotus automobiles) obsession with weight reduction. These suckers are relatively heavy! Just like the horn on my bike, they are riveted together.

2436-riveted-horn.jpg

So much for the idea of taking them apart for cleaning and repair, if needed. The good news is they are almost completely hidden inside the bonnet mouth so if they get replaced nobody will notice. I need to rig up a 12V supply and test ’em.

Well, that’s the end of what made sense to strip out of the bonnet right now. My friends suggested a bonnet removal party, since four or more people are recommended to handle the whole bonnet. After stripping off all the pieces except the internal dividers (or breaking it into three chunks) it still weighs 250 lbs or so. I read and re-read the Haynes manual instructions on removal and studied the problem. You’d have chuckled at me walking back and forth, studying it like the lay of the balls on a billiard table. I made some decisions and dove in. I said to myself, “self, if you’re so smart you should be able to do this by yourself!” Feel free to cringe now.

The car sits too low for me to get some of my bonnet-lifting ideas under it. So the first step was to put the front wheels on ramps. Consulting the manuals I found there are side jacking points designed under the doors.

2421-jacking-point.jpg

A bit nasty under there. At least the side did not collapse when I stacked some wood on top of a floor jack and lifted.

2422-on-ramps.jpg

Voila! On ramps. The bonnet hinges rotate, one pivot on each side of the car. The hinge is held onto the pivot by a single bolt that can be removed with the bonnet in just about any position. The book recommends opening the bonnet against some wood at the front to remove weight from the pivot. Nothing happens because the bonnet hinges are still sitting on pivot points, just not secured —

2423-bonnet-hinge.jpg

There is also a spring-assist arm on each side, held to the frame rails by a single shoulder-bolt & nut, with large brass washers on each side. The shoulder of that bolt is another pivot surface. These should be removed with the bonnet nearly closed. Otherwise the springs are pulling on them. Once you remove these the bonnet loses its counter-balance and is heavy to lift at the rear end. Maybe 50 lbs or so to lift. So before I pulled the spring assist bolts I rigged up my mechanical advantages —

2425-hoist-jack.jpg

That is an ATV/motorcycle lift at the front. Don’t try this at home, kids —

2426-dont-try-this-at-home.jpg

I know. I can hear you yelling at your screens now. Bear with me.

I would not suggest this technique for a perfect bonnet. But mine was so messed up I had to pry the back left louver open (louvre to you Brits) to pass the strap through! As I mentioned above, we’re only supporting 50 lbs or so at the back end. No louvers were harmed in the filming of this movie. Okay, so now you’re yelling at me for lifting off to one side. I could not reach the center (ramps under wheels limited hoist position) and since most of the weight was at the front I did not expect any massive swings from the off-center lift.

Here’s the hinge and spring hardware I mentioned above —

2428-hinge-spring-hardware.jpg

The book says at this point I can loosen just one of the hinge attachments to the bonnet (four bolts hold each against reinforced bonnet sections) and my crew of bonnet assistants should be able to pull sideways and pop both hinges off the frame pivots and lift the bonnet off. My bonnet assistants were not as flexible as live people so I ended up loosening both hinges before I could get them to release off the pivots. Note that loosening the hinges means I completely lost the bonnet position adjustment. I figured that was no big deal since I anticipate replacing the front frame and THAT, along with body work on the bonnet, requires a re-fit anyway. I think Classic Jaguar sells replacement hinges with a greater range of adjustment if needed.

Aside from that, removal went smoothly. After the pivots were free I had to lift both ends more to clear the tires, pulling it forward.

I had previously cut some 3/4″ plywood to fit the end of the bonnet and set that on some furniture dollys ($9 each at Harbor Freight). I set the rear end of the bonnet on the edge of the wood and lifted/tilted the front end up. The front weighed just a bit more than I was comfortable dead-lifting-to-shoulder-press myself so I asked my wife to give me a hand. Ta da!

2437-bonnet-on-stand.jpg

I suppose this lift technique could damage the two bottom bonnet corners I pivoted on but I figured that would be a drop in the bucket-o-body work to be done on the hood. As it happened I did not notice any additional damage. This wheeled arrangement fit to the side of the car in my garage. It blocks one set of shelves but I can move it effortlessly if needed.

Mind, and mechanical advantage, over matter. I figure my body shop will be assembling the bonnet back onto the body, not me. I have some experience with paint and body work, enough to know that someone has to do it for me! When I was in high school I helped my dad fix up a 1954 Volvo 544 (looked like a split-windshield Ford). That involved hammers, body dollys, Bondo, and many cans of Rustoleum (dad’s favorite paint). I sure am glad that car finally burned up (can you say “car-b-que?”) when he was driving it and not me. He’d never have believed it wasn’t my fault!

Here are some pictures of the current state of the front end, now that the bonnet is off. Those SU carbs are tempting but I’ve still got the rear body lights & trim or the entire interior to chose from too. A target rich environment! I’m trying not to get overwhelmed by the magnitude of the big picture. I figure if I chip away at enough small stuff and stay somewhat organized I’ll come out the other end with my sanity intact.

2438-front-end.jpg

2440-engine-right-side.jpg

Here’s a close-up of the right suspension. The arrow points to the bonnet pivot point.

2439-right-front-suspension.jpg

Notice anything unusual? That’s right, no coil spring. There is a “torsion bar” instead. Peculiar and probably a pain to adjust.

That’s it for this week. I’m thinking of trying every-other-week blog entries. There really is not enough action on a weekly basis in a project of this duration. So unless something more exciting than “look at the bolts I cleaned up!” happens I’ll see you in two weeks. Cheerio!

November 4, 2007

Our first mystery!

Filed under: 1962, auto restoration, car restoration, convertible, E-Type, Jaguar, restoration, xk, XKE — Tags: , , , — Penforhire @ 5:19 pm

I got that offending front bumper bolt undone. Here is a view of the over-rider-to-cross-piece situation. The other side did have a welded nut on the bumper.

2404-bumper-bolt.jpg

Why is it looking chewed up? Because I attacked it with this —

2405-dremel-diamond-bit.jpg

This is a cheap diamond grit Dremel tip, bought in an assortment from Harbor Freight on sale. Good thing they’re cheap because if you use a little too much sideways pressure and let things get too hot —

2407-broken-bit.jpg

Anyway, when all was said and done I still had all ten fingers and here is a better look at the nut I was cursing —

2408-offending-nut.jpg

See how it just has a round knurled edge? Children, don’t use anything like this in hard-to-reach places! I might have been able to get a grip if it was an ordinary hex-nut. So, does anyone know if this is an original construction? Or did some fool do this later?

So here’s the big mystery for this post. As I was cleaning up the newly free bumper wing I spotted what looks like an engraving.

2411-mystery-cl-494-mark.jpg

I believe it is the letters “CL” with “494” under them, written on the welded cross-piece for a bolt that holds the bumper wing to the bonnet. It might be hand-written with an engraving tool but there is a connection to the letters, like cursive writing, that might imply a machine wrote it. I have not read about this particular mark anywhere yet. I searched at Jag-Lovers but found nothing. So the mystery is, what does this engraving mean?

Was the bumper outsourced and then shipped to a Jaguar factory at 494 Coventry Lane? Were employees paid piecework and some CL person completed their 494th bumper? Put the answer in a comment and you’ll be immortalized here! If I don’t get an answer here I’ll post the question on the E-Type board and see if anyone knows.

You might recall I mentioned one of the headlight buckets was banged up. Here’s the best view I could capture.

2412-banged-up-bucket.jpg

The wrinkling must have chipped the paint and that started rusting. I used a large punch to flatten out the wrinkled area.

2413-punch-in-sanded-shell.jpg

I suppose a multi-ton press and some flat plates might have made an easier fix. You can see here I started sanding the buckets because I decided to repaint them. Getting all the road splooge off them revealed too much bare metal and rust.

Here they are, ready to paint.

2414-headlight-shells-ready-to-paint.jpg

I used a Krylon epoxy primer sold for use on rust.

2415-primered.jpg

Followed by Krylon epoxy gloss black.

2419-gloss-black.jpg

Should look just fine under the bonnet. If you do this remember to scuff up the old paint with some sandpaper or other abrasive first. Then make sure you clean off all the dust and dry the surface before spraying primer.

Here’s the chromed rear bonnet vent. This is what the driver sees, looking at the rear of the bonnet hump.

2416-bonnet-rear-vent-messed-up.jpg

In this case it has nasty overspray from that blue paint job. I’ve got some advice for anyone out there thinking an inexpensive paint job will make their old paint look better. Don’t do it. Your old paint looks fine from 200 yards away and a cheap paint job looks just as bad or worse close-up. Just how much effort would it have been to remove those two screws and pop off this part before spraying the bonnet? A heck of a lot less effort than it took me to clean it up 35 years later!

2420-bonnet-rear-vent-cleaned-up.jpg

Looks nice now, eh? Only took hours of tedious scraping and buffing. This might be the first chromed part I cleaned up that could go back on the finished car without re-chroming. It has tiny bubbles in the chrome but you have to look close to see ’em.

I promised you a look at how I came up with my $50K estimate for this project. Some items, like paint & body, are very soft estimates. Some are straight catalog prices. Others vary depending on how much I do myself. For instance the IRS rebuild can cost less than half what I listed if I can do it all myself. These are not all sources I am determined to buy from but rather a simple pile of line items. For instance I’ll likely go to E-Type Fabs for the front frame (or use a hidden Pertronics Ignitor instead of an ugly Mallory distributor). I apologize for the column spacing. I still haven’t figured out how to transpose a spreadsheet to format properly here —

Paint & body work $12,000
Engine & heads rebuild $10,000
Suffolk & Turley interior kit, CJ’s $5,040
IRS rebuild $4,760
New front frame (all pieces), CJ $4,180
Chrome bits and rechroming $3,000
Tranny rebuild + new clutch $2,000
Tubeless wire wheels, Daytons, from CJ’s $1,700
Harnesses (all) from CJ $1,236
Tires (TBD, inc. size) $1,000
Alternator conversion $750
Instrument repairs $750
Stainless exhaust system, Welsh $736
Rubber seals kit, CJ’s $635
Aluminum radiator, fan, switch – Cool Cat $550
Replacement convertible top $550
Shocks & springs, CJ’s $500
Mallory Unilite ignition, Classic Jaguar $395
SU carb rebuild parts $300
battery $150
poly bushing kit, Cool Cat $140
spin-on oil filter conversion, Cool Cat $75

Total $50,447

Yow! Seems like a lot but it could easily grow. I’ve read about several $20K+ paint & body restorations. And I can see an easy 20+ hours of skilled labor just straightening the bonnet.

See you next time, when the mysteries are sure to deepen.

October 28, 2007

Meet Mr. Lucas

Filed under: Uncategorized — Tags: , , , , , — Penforhire @ 6:03 pm

If you are easily offended by my misappropriation of British slang or my future slurs against Saint Lucas you better stop reading right now. Note Joseph Lucas started the business in the 1860’s so we’re not insulting him so much as tossers who continued his company.

The response to my restoration announcement was fantastic on the Jag-Lovers board. There are many enthusiastic E-Type owners who struggled through their own restorations and contacted me directly. Even elsewhere (e.g. Honda S2000 owners) the classic car crowd just boils out of the woodwork when the topic was raised. The BMW motorcycle crowd was helpful during my R75/5 restoration but the feeling was more lone wolf. Maybe that’s just the nature of bikes and BMW airheads in particular? The modern BMW car crowd, another group I deal with, is downright apathetic by comparison. Too many owners who are not enthusiasts. Or as Brad called it, not (Meguiar’s) “car crazy” enough.

I am especially encouraged by photos of XKE’s that were worse off than my starting condition and now look stunning. Let me direct you to one example from an owner that contacted me — http://www.xkedata.com/cars/detail/?car=878152

Jim has plenty of photos of his most excellent restoration but check out how it started — http://www.xkedata.com/gallery/zoom/?id=59656 My car starts out pretty good by comparison. You might not notice this but his chassis number is only 104 away from mine.

Think that is close? I got an e-mail from Geoff in England whose chassis number is 878237 (he says build date Sept 26th, 1962). That’s only 19 cars away from mine! They probably “saw” each other in the factory. His was converted to right hand drive by a previous owner so the proximity of S/N confused me until he mentioned that.

On to some actual resto work!

I started by removing the front turn signals. Both lenses were busted and painted over so I have no choice but to replace them. Here’s the right signal housing —

2352-left-front-turn-signal-under-lens.jpg

Some more obvious screws hold it in place. The gaskets on both side of the housing (rubber under base, seemed like foam under lens) were completely shot and fell apart on disassembly. Here’s the wiring to the signal (and running light?).

2357-backside-of-front-turn-signal.jpg

This here was my introduction to Mr. Lucas. You may recall that whenever something on my BMW R75/5 didn’t make sense I blamed an imaginary design engineer named Hans. I even found some German slang words to call him. Well I’m sure even BMW’s village idiot got quite a chuckle seeing some of the designs of older English cars. If you were me you would expect those turn signal lamps to be twisted into now-common bayonet mounts with wires screwed or crimped in place. Sh’yea right.

Here’s the odd base of one of the lamp sockets, right when Mr. Lucas first said hello to me on this job —

2353-lucas-lamp-base.jpg

This is some sort of particle board with a metal rivet stuck into a slot. A spring is trapped between the signal housing and the particle board The turn signal housings cannot be removed without disassembling these. Upon disassembly the particle board bases naturally convert into dust! We’ll see how much replacements cost. I can see fabricating my own with a Dremel tool and some bare G10 or FR4 printed circuit board.

Someone in England thought they were the dog’s bollocks when they designed these, eh? Wanker!

The turn signal housings cleaned up pretty well with Nevr-Dull wadding so I’m not absolutely certain I’ll rechrome them. If I don’t they will corrode quickly in the future, through small pores in the plating from prior corrosion.

Here’s the right headlight as received —

2345-headlight-as-delivered.jpg

Remove the trim screws, pull off the glass & gasket, loosen the three screws holding the lamp retainer, pull the lamp & retaining ring, and you get —

2365-behind-right-headlight.jpg

Again, the trim pieces cleaned up with Nevr-Dull but have too many small pores to leave ’em as-is.

Loosen more spring-loaded screws, unhook one spring and —

2366-further-behind-headlight.jpg

I don’t actually know what I’m doing yet. My intention here was to remove the front bumpers. To do that I have to remove the headlight “sugar scoops.” To do THAT the repair manuals are awfully vague. They all talk about three retaining screws holding the scoops. I thought they meant these, under the bonnet —

2364-right-headlight-under-bonnet.jpg

Alas that did not allow the scoop to just pop out. So I dug into the headlight area to remove everything else. Not much detail there in the manuals either. Turns out those WERE the three nuts holding the scoop. There might be prior damage or else I tweaked it myself, but here is the right scoop with an arrow pointing to the trouble —

2369-right-sugar-scoop.jpg

This car has definitely been worked on before. Not everything matches up perectly. The headlight adjuster on the left side has these wire retainers for the adjusting bolt heads —

2378-retaining-wire-on-headlight-adjuster.jpg

The right side did not have any. Seemed to “retain” just fine though. The right side headlight bucket (the circular part covered with sludge above) has some damage that did not photograph well (so no pic for you!). The back wall is supposed to have a smooth slope but this one has a severe wrinkle. It is exposed on the underside of the bonnet so something whacked it in the distant past.

After getting the sugar scoop out here is one of the two bolts-with-plates holding the bumper.

2382-front-bumper-bolt.jpg

Here’s what the pieces of the bumper look like with “over-riders” still on the bumper wings.

2384-front-bumper-pieces.jpg

One of the coolest items I found so far is the emblem in the center of the “motif bar.” Hey, that’s exactly what the manuals call it!

2385-center-of-motif-bar.jpg

Nice kitty. I sure hope I can find a replacement because this would be a bear (jaguar?) to restore. Here’s the retaining mechanism rusted up on the backside, a spring bar, plate, and two screws.

2386-motif-bar-back-side.jpg

The bumper over-riders are held on by one piece and I forgot there is yet another bit-of-bumper held on with two screws. As shown here —

2387-bumper-overrider-bolts.jpg

Things got really weird on one bumper wing. The over-rider is normally threaded for that big bolt (or there is a welded nut I need to check again). But on the weird side there is a circular nut holding it (didn’t get a clear picture for you). No big deal right? Uh, not true! The bolt is rusted in place and there is no room or angle to get a decent vice-grip on the round nut (has a thin knurl section). I’ve got it soaking in penetrating oil now but I may end up cutting that bolt off!

The one I could remove cleaned up pretty well. Both have dings that need fixing before any rechroming.

2388-cleaned-up-overrider-with-dings.jpg

Here are the two bumper wings, one cleaned up.

2390-bumpers-cleaned-original.jpg

Even though these pieces are a hundred percent better than before cleaning they all really need rechroming. I sure wish dad did not apply the equivalent of Earl Scheib’s $99.95 paint job to this machine. I was scraping off blue overspray on the bumpers for hours. And the headlight sugar scoop is supposed to be the medium grey color you can vaguely see in the edges of the photo above.

Here’s a shot of the wiring for the headlight —

2367-right-headlight-wiring.jpg

I got some new toys for this restoration. Here is a vibratory bowl from Eastwood company —

2359-eastwood-vibratory-bowl.jpg

I used beadblasting to remove corrosion on all the BMW R75/5’s hardware. But not only does that leave a satin finish, or rougher, but I got tired of glass grit getting in my eyes (despite using a tiny cabinet). This process promises to be less labor intensive, though it probably costs more in electricity and media.

This gets half-filled with rust cutting media, sharp green pyramids —

2358-rust-cut-media.jpg

I decided to try a test lot to see how aggressive this process is. I ran the following parts dry, I believe I can run wet for faster action.

2360-bowl-test-parts.jpg

After about one and a half hours they looked like —

2361-after-one-hour-thirty-minutes.jpg

After four hours it looks like we’re ready to polish (corn cob or walnut shell media) if necessary —

2368-after-four-hours.jpg

Not bad. A few observations. Parts must be degreased prior to vibrating. The media doesn’t do much to soft gunk, similar to bead blasting. Eastwood claims the bowl should not “walk” because of the soft-foot base. Yeah, in their dreams. It moves around slowly, depending on the exact surface I set it on, until it gets counter tension in the power cord. The noise is unpleasant. You can’t really box it in because the motor needs air for cooling. I need to run this when I’m out of the garage or else wear ear plugs. My air compressor is more pleasant to listen to (Sears ‘Pro’ 2 HP, not the monkey-on-crack scream of typical small compressors).

And here’s a Chinese-made (hard to avoid these days) cherry picker from Harbor Freight —

2362-chinese-cherry-picker.jpg

This one folds up to take up less storage room. I figure to use it to pull off the bonnet in addition to the motor & trans. This hoist took an annoying amount of time to construct. The instructions were, well, inscrutable. I can imagine the manufacturer’s customer support group editing them, “no, not illegible enough yet. Defocus some more… Ahh, that’s it. That’ll make them suffer.”

Let me leave you with another shock to my system. I knew this might be the case but hands-on it still feels wrong to reach for inch-based (Imperial, English) tools. This car was built before England converted to the metric system. Darn. I have a reasonable collection of metric tools but my English set is a bit primitive. Don’t tell me I need some Whitworth size tools? Tell me it isn’t so!

October 24, 2007

Origin

Filed under: Uncategorized — Tags: , , , , — Penforhire @ 2:33 am

Hello dear reader. This blog will document the long sad tale (oh you’ll laugh, I’ll cry) of my attempt to restore my father-in-law’s 1962 Jaguar E-Type, a.k.a. XKE. It is a OTS model (Open Two Seater, meaning convertible). It is not one of the very first “flat floor” models but it is an early Series One, with covered headlights, turn signals above the bumper, and a 3.8 liter straight six fed by three SU carbs.

My father-in-law purchased it new. A minor accident, “shunt” in UK-speak, took it off the roads. It sat still in his garage for about 35 years. I figured when he retired, financially well off, he’d have a professional restore it but he seemed to have lost interest in it. I have two brother-in-laws and a sister-in-law (and her hubby) who had first pick to take it, me being the last into the family, but they never expressed interest to dad. It was some years after marrying my wife before I even knew this car existed. It lived under a massive pile in their never-seen garage.

The Series One E-type represents a sports car archetype to me. It is one of the sexiest cars ever made. Even Enzo Ferrari is said to have admired it. So you can imagine when I heard about it I began a campaign pestering my father-in-law to restore it for his own use. I’m sure my eyes glowed whenever I spoke of it. When he recently suggested selling it I performed substantial research on prices and model details. My continuous interest led to my in-law parents giving it to me, with condition that it stay in the family or else divide any proceeds should I ever decide to sell it. Sounds fair to me. Don’t let him know but I’m really looking forward to loaning it to him so he can drive it to local golf games, one of his passions.

What makes me think I can do this? I mean, these cars are very expensive to restore if most of the work is done by pros. All costs, parts & labor, have risen dramatically in recent years. Typical show-car restoration on these run over $100K with winners spending $150K or more. To give you an idea of value, top offerings, say the best sold by Barrett-Jackson, sell for $100-125K. Excellent condition cars can be found down to $50K. Daily drivers can be found down to $25K or less.

Anyway, why do I dare think I might contribute enough sweat-equity to this project? Well, my father passed away last December and I spent nine months doing a down-to-frame restoration of his 1973 BMW R75/5 motorcycle. I wrote a big blog, my first ever, on that effort (see http://penforhire.wordpress.com). I’m not like some mechanical guru. Mistakes are frequent in my work but I seem to enjoy the wrenching. My friends enjoyed watching my efforts in the blog, sometimes nearing slapstick humor, and not many folks post that sort of detailed information on doing the work and lessons learned. It is a big extra effort to maintain a super-detailed blog so I might play it a little looser here. We’ll see. As it happens, that BMW motorcycle restoration was a success, though I did come in at about double my original budget.

I wonder if I learned anything? Well, I expect to take five years or so to complete this XKE resto. I’m thinking I’ll spend $50K (I’ll share my budget assumptions in another post). I hope I’m more realistic on this go-around but the only way to tell is to do it. There is certainly more of a chance this machine will never be restored but rather join the ranks of basketcases in garages around the world. So this project will either build my character or explode it.

The serial number is 878256. According to Dr. Thomas Haddock’s “Restoration Guide” this means it was built September or October of 1962. The California registration says 00/00/62. Oddly to my mind, there are no actual year markings on the car. Did Jaguar not want to be locked into specifying the model year of its inventory? They certainly had no respect for running through a given model year with no changes. Dr. Haddock’s book is an attempt to track the nearly continuous changes in so many model details. I have no idea how concours judges can rate true originality since even the good Dr. mentions his findings are estimates.

Enough chit-chat. Time for some photos. Here are some pics of the car freshly flat-bedded to my garage.

2332-as-delivered.jpg

You can see the shunt damage on the nose (slid under a truck). The car was originally black but somewhere along the way my father-in-law painted it blue. It was garaged in Harbor City, not on the ocean but there is widespread corrosion anyway. I’m going to become good friends with a chrome plate shop somewhere!

Here’s the rear end.

2334-rear-end.jpg

Notice the hole in the soft top at the right-rear? Yep, rats (or mice or ?). I vacuumed out quite a few rat droppings. Did you know the head, between the cams, makes a really nice rat nest?

Speaking of engine —

2340-xk-engine.jpg

Hmm. I seem to be missing the intake and filter on the carbs. Have to ask dad about those.

Here’s the interior —
2343-interior.jpg

Dig those brown shag carpet remnants. Geez that aluminum paneling is cool!

Okay, a little more about this particular car. I believe it has 107K miles (odo says 07646). Dad replaced the tranny with a later-year item. I don’t know the ratios yet but it has first gear synchro (yay!). It has an intake camshaft from a later year (unknown details, oil passages where OEM had none) because the original snapped.

Well that’s all for now. As some of you know, I encourage you to leave comments, hopefully to help the next guy reading this blog who is wondering how to do something right. Not the way I did whatever.

« Newer Posts

Create a free website or blog at WordPress.com.