Since last we talked I’ve been trying to line up throttle shaft re-bushing service for my SU carbs. I explained the process in my last post and while it is not brain surgery many owners persuaded me not to try myself.
I happen to live in a densely populated area near Los Angeles so it is no surprise that there are a half-dozen or so shops within driving distance that claim to specialize in carburetors. What is a surprise is the shadowy existence of these shops. Maybe there is something inherently flakey about carb repair specialists? Let me re-enact the call I had with one such shop, Doctor Smith Carburetors.
Me: dial xxx-xxx-xxxx, brrrring, brrrring
Doc: Grunt, sort of like “Guh!” or maybe “Ugh!”
Me: “Hello?”
Doc: “Arrrrrr, I’m a pirate!” Well it wasn’t really those words but that’s sort of what I hear.
Me: Pause. What did he say? “Hello, is this Dr Smith Carbs?”
Doc: “Yeah” Hmm, maybe he had a chicken stuck in his throat?
Me: “Oh. Good. I’m looking for a shop that can re-bush the throttle shaft on some SU carbs. Is that something you guys do?”
Doc: “Arrrrrr, I’m a pirate!” Hmm, now I could swear that is exactly what he said… again.
Me: Pause. Try to digest his words. Any other possible meaning? “Um… I’m looking for carburetor repair service?”
Doc: “Nyuk, nyuk, nyuk!” or something really close to that, with a Three Stooges lilt. And he hangs up. The line goes dead.
I’m staring at my phone like maybe it isn’t working right. Only my phone is fine. And I’m not deaf or even hard of hearing. Who knew that pirates do indeed repair carbs? I’d have suspected a five year old got loose in his office and answered the phone but the voice was clearly a middle-aged man.
That exchange was so surreal, and sort of funny, that I had to share it with you. Yes, that is just how I remember the call. No kidding.
The two other closest shops, P&J Carb and Carb Care USA don’t seem to answer their phones the several times I’ve called. I have this vision of a single mechanic lying on a creeper under a car when the phone rings. But we’re talking about carbs here right? So, what, maybe loud engine-stand or flow bench testing? Dunno, but I left a message and we’ll see if they return the call.
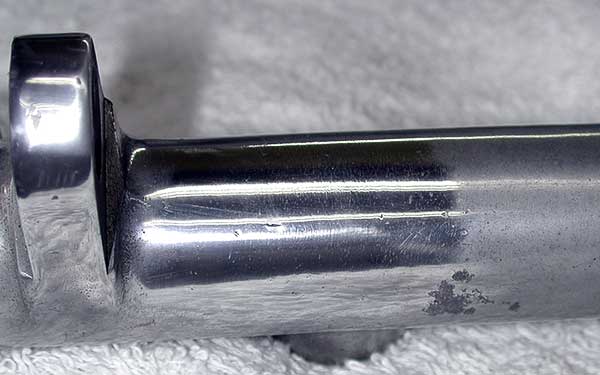
Back to other things. You must have commitment when you decide to polish something. If you start but don’t finish it’ll be obvious and look like crap. Here’s the start of polishing up that air balancing manifold.
And here, presto change-o, like magic, is the polished air balancing manifold.
Do I really need to mention how many hours went into this? This photo represents more work than most of the rest of this post’s work. But would you really want to see a hundred photos of me polishing the same damn piece of aluminum? Didn’t think so.
I didn’t take pictures of it but I also worked on the throttle linkage bits (see bits in last post). The smaller pieces de-rusted okay in a vibratory bowl after about two hours in wet green pyramid media. Then I worked them with emery grit on a polishing wheel. I went all the way down to 200 grit sandpaper on the larger linkage pieces but even then I am not entirely happy with how they turned out. Some of the corrosion spots are just too deep, structurally sound but a cosmetic weakness.
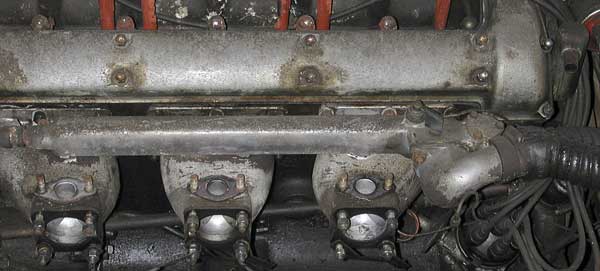
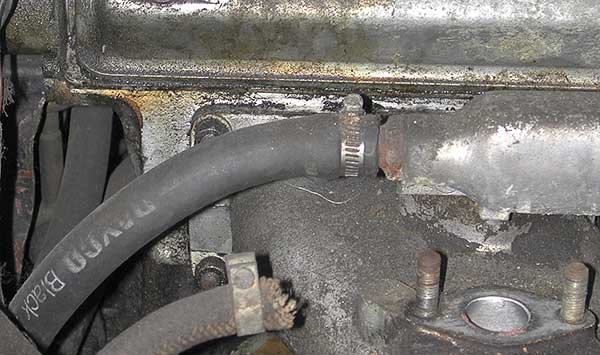
Speaking of awful corrosion, here is the water manifold, rubber hoses going to the radiator.
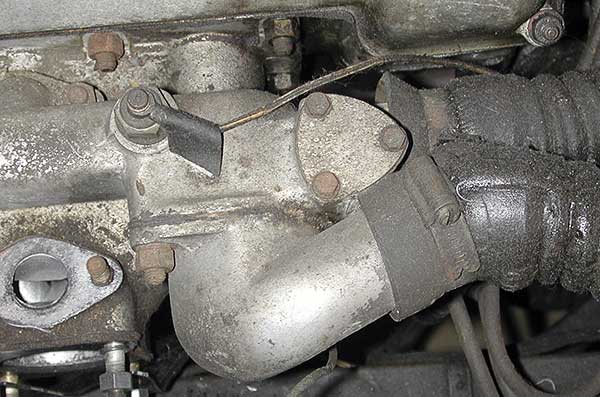
Here is a closeup of the forward end.
That yellowish wire off some sensor (temperature? pressure?) turns green as it passes below the rubber hoses. The hose nearest the engine goes down.
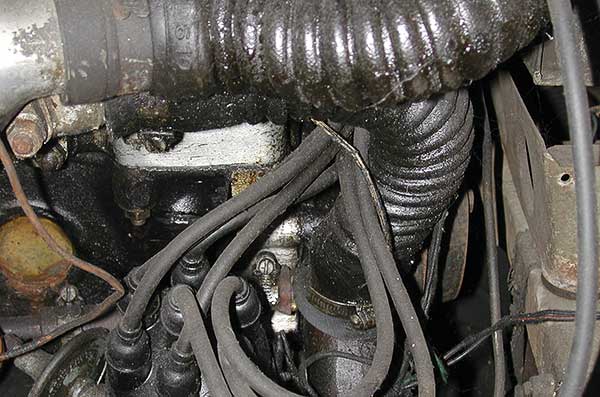
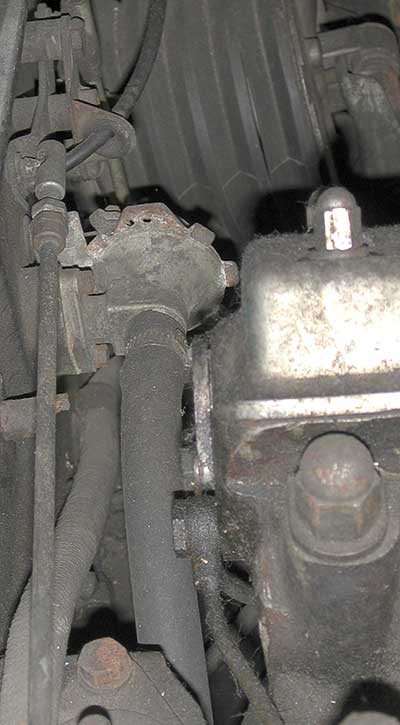
The other hose goes to a box on top of the radiator. Here is the back end of the water manifold.
That hose off the end snakes behind the engine and ends at a what’s-a-whose-its (TBD) just under the firewall throttle linkage.
Here is the water manifold on my bench.
This was not the easiest part to separate from the air manifolds under it. It had corrosion-welded itself to a couple of the mounting studs. I banged around with penetrating oil for a while but I still had to pry it off. As I took it apart I began to despair of the possibility of reusing it. It has an awful lot of corrosion. And I started to get nervous about the other water passageways.
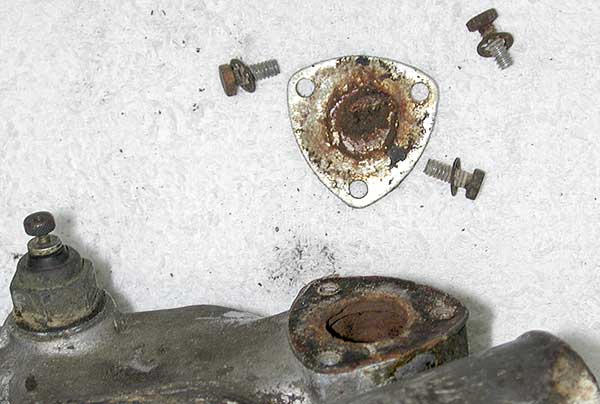
Here is one of the three water outlets that goes to (and through) the air intakes.
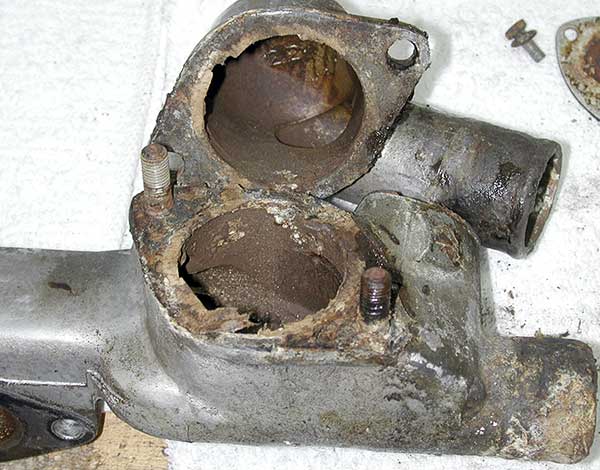
Here is the forward end, where the rubber hoses connect.
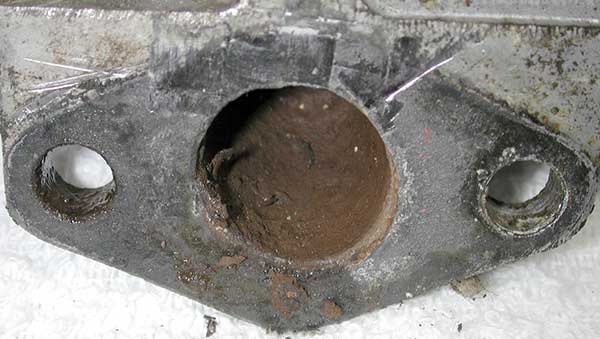
Hmm, I imagine this is where the thermostat goes? Nothing but an empty chamber right now.
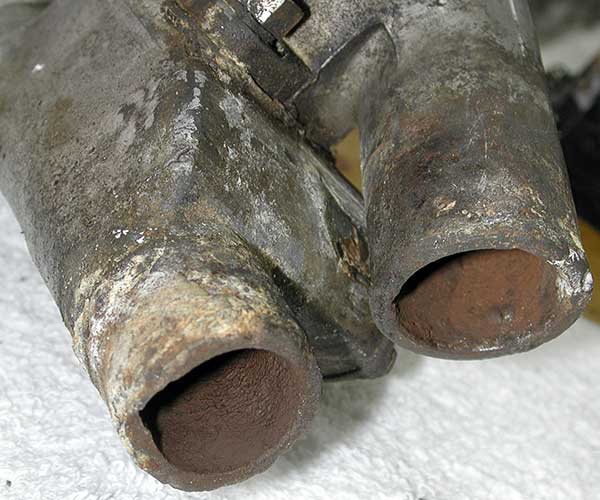
Here is the radiator return loop split open.
At this point I threw the manifold in a box rather than spend time polishing it up. I think I’ll be buying a new one though the shaping makes it look expensive. Oh well, win some lose some.
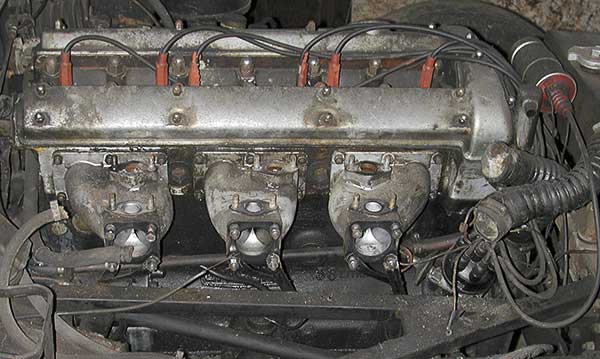
Here is the engine without that water manifold.
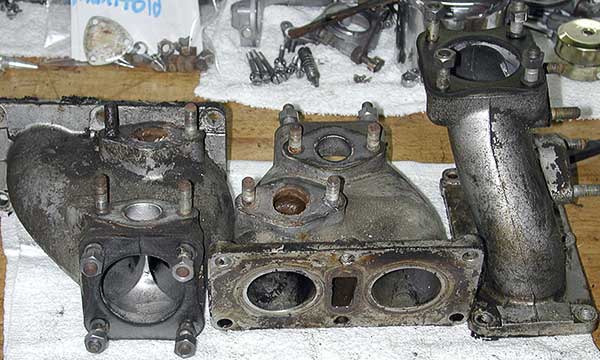
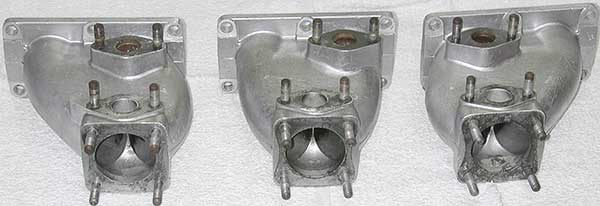
I pressed on. Here are the three air intake manifolds on my bench.
They are completely different shapes and you’d have to be an idiot to remount them incorrectly. Hold that thought for a few months or years. These also continue the tradition on this machine of not allowing enough space around nuts to use a proper socket or Gearwrench. You can only fit open-end or thin box-end wrenches on many of the mounting nuts. And of course you can’t swing in a big arc. Tedious and far too common. If I was spoiled by my air ratchet and Gearwrenches, well, this machine will keep me humble.
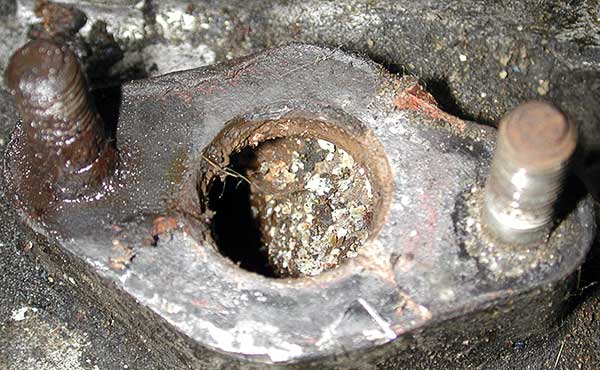
Here’s a view of one of the water inlets on top of an air manifold. This delivers water to the head right between the siamesed air runners. You can see the rectangular outlet slot to the head on the center manifold in the photo above.
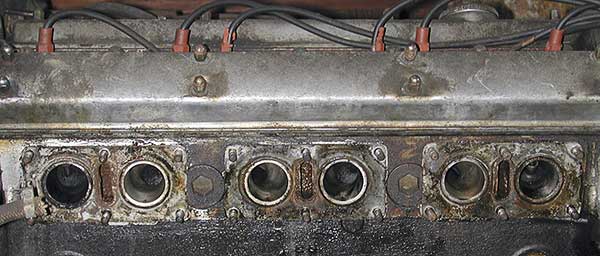
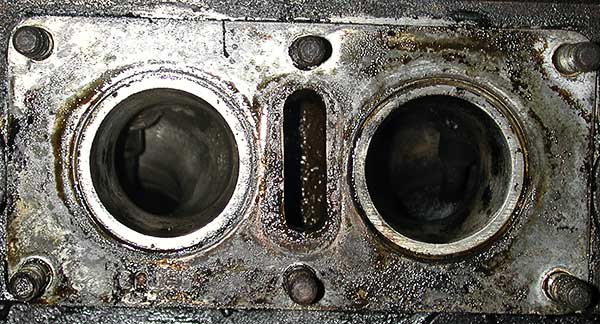
Nice corrosion. Here is the engine head without the intakes on it.
And a close-up.
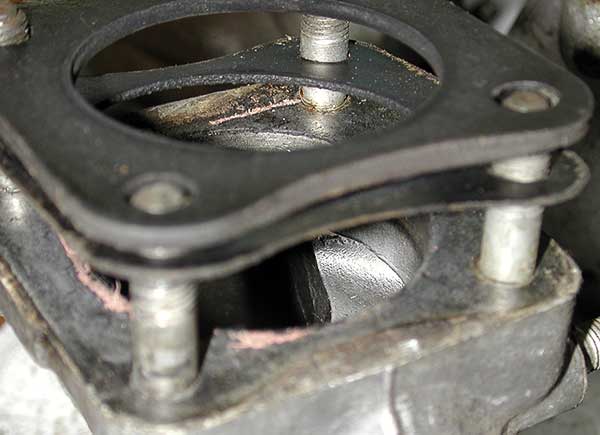
On the carburetor side of the air intakes there were two stacked gaskets, thick and thin.
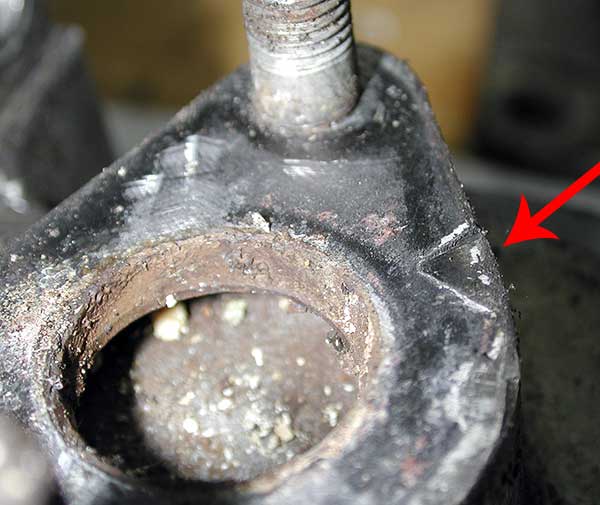
Here is another of those water inlets to the air manifold. The arrow points to a gouge where something took a bite.
Doesn’t leave much area for sealing water pressure right there. I can see I’ll be slathering the Hylomar or other gasket seal liberally.
And to end the suspense, cleaned up air intakes.
Nice! I still need to clean up the water interior passages. Does anyone have suggestions on the best fluids or technique to get rusty gunk out of there?
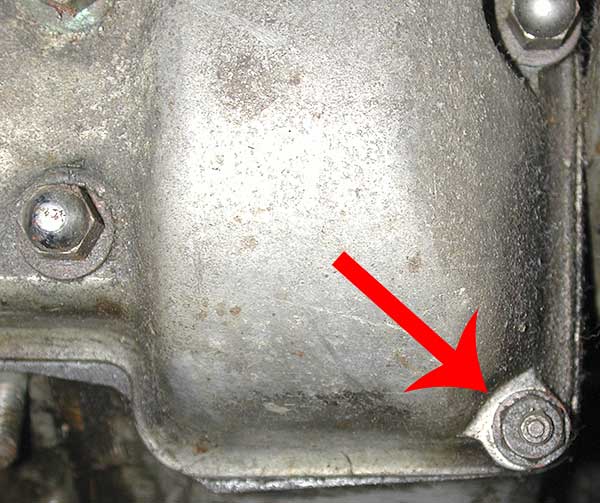
Here’s a preview of my next intended work. The arrow below points to an oddball valve cover nut on the front passenger side.
All the rest are chromed acorns. Why is that one plain? A mystery for another time.
So matey, keep a weather eye peeled for this here monkey with a wrench. I’m off to find a scurvy dog to work on my carbs. Abandon hope, all ye who enter here (I used to have a variation of that slogan on the front license plate frame of my Integra GSR, “Abandon hope, all ye who enter under here”).


I just happened onto your blog recently. Man o man…very familiar photos to me. I completley restored a ’66 E-Type piece by piece as you are doing. 25 years later it was the 2003 National Champion. Main difference is that mine is a 4.2 and yours a 3.8, other than that, very similar.
Here is my E-Type:

If you are not willing to work on your carbs yourself, I would recommend Joe Curto in NY. He has forgotten more about SU carbs than you and I will ever hope to know. http://www.joecurtoinc.com/
Good luck, and keep taking pictures.
Comment by Patrick McLoad — April 1, 2008 @ 6:56 pm
Woah! Patrick, that motor link is stunning!
Got any more shots of your car? Multiple angles (hint, nudge, wink)? I can see so many similarities between the 4.2 and 3.8 motors just from this one image.
I can also see how yours could win awards. I’m learning about all the ‘correct’ concours items, like how your front frame is painted in the body color.
Comment by Penforhire — April 2, 2008 @ 7:21 am
Penforhire:
Well, anyone with a Champ class Jaguar tends to show it a lot, and as a result, usually have boxes of trophies and stuff like that. Believe me, its nice to have them, but after awhile it blurs the purpose of restoring the car….to be driven; not to end up as museum pieces or trailer queens.
I understand where you are in your project. But at some point in time, you need to decide which road to take: a “perfect”, ultra-clean, ultra-correct E-Type, or, a driver. Not that you can’t have both, it’s just that many people do not want to go to the trouble, time, and expense to completely take EVERYTHING off the firewall, including removing the engine, and having the firewall and frames re-painted. But the thing is, if your engine needs rebuilding, as well as brake calipers, new brake lines, rebuilt master cylinders, new rubber bushings and/or ball joints….then darn it, everything will be off the car anyway, and you will NEVER have that opportunity again! And if you plan on having the car repainted, it would be a damn shame if you didn’t do the firewall and frames as well.
Yes, it will take a lot of work and many years, but if you look at my engine compartment, that’s what you can end up with, and, the car will be worth so much more money if properly restored. So yeah, you can take things apart, clean and polish, but don’t forget to look at the big picture at the end of that tunnel.
I don’t know if you are aware or not, but there is an organization called Jaguar Cars of North America, or JCNA for short. The website is http://www.JCNA.com
JCNA is made up of smaller affiliate clubs all around the country. It would be well worth your time to join a local club so that you can see other E-Types at various concours shows. This is pretty much how I learned what is “right” and what is not for an E-Type.
In addition, you can go to the Tech. Library of JCNA and find lots of useful tips, as well as an E-Type Series-1 Authenticity Guide that you can download and/or print out….for free. The forum is always a good place to post questions.
But to keep this short, the way you are doing it is correct: takes lots of photos as the car is coming apart. Buy a bunch of different size zip-lock bags and keep the parts together with a label inside with the parts. You can even go so far as to get some inexpensive clear plastic tubs to hold, say, all intake stuff including manifolds, carbs, linkage, etc.
I don’t know how long your car has been sitting, but you might as well regard your brake calipers as TOAST. All you have to do is take one of them apart, and you’ll see how rusty they are. As you know, hydraulic fluid is hydroscopic (?) meaning it absorbs moisture from the air. This moisture rusts all of your hydraulic components from the inside, including master cylinders. I would have all of the calipers re-sleeved (brass or stainless steel), as well as master cylinders. I would even replace the hydraulic lines as they are rusted as well. Don’t skimp on the brakes!!
So yes, you can start polishing parts now if it makes you feel good, but frankly, I’d save that for when its time to bolt stuff back on. If you have not done so already, you need to get some compression readings from your cylinders. They all need to be in the 150-160 pounds range, and within 10 pounds of each other. If you don’t have a good solid engine, then you’re ignoring the heart of your cat, and it will never run at its potential.
If you don’t have one, you really need to get a proper manual for the car. I prefer an actual workshop manual as well as spare parts manual. Somebody on EPay is selling CD’s that contain both, but I don’t know if they are any good…but perhaps it’s a low-cost start. The exploded views are very helpful! Also download the on-line parts catalogs for the E-Type from XK’s Unlimited as well as SNG Barratt. Be certain to shop your parts as both have different prices, SNG tends to have more “authentically correct” parts than XK’s these days, but both are useful.
Should you have any other questions, don’t hesitate to e-mail me at mcload@gmail.com.
If you are not carefull, your E-Type will become addictive!
Comment by Patrick McLoad — April 2, 2008 @ 8:24 pm
Here is another photo:
Comment by Patrick McLoad — April 2, 2008 @ 8:32 pm
Looking back on some of your past blog posts, I have a couple of comments. Make sure to call Joe Curto on the phone…it take a looong time for him to answer e-mails just from the sheer number he gets.
The little numbered tags on each over-flow banjo bolt are of utmost value to originality. The last letter in the sequence designates front, center, or rear carb.
In the cap of the fuel bowl is a small triangular valve that regulates the gas or air that passes through the overflow tube. This tiny valve has been the cause of many Jaguar E-Type fires. The valve sticks open and raw gas is continually dumped through the overflow tube, onto a hot engine causing a fire. These valves need to be replaced with Grosse Jet valves. It is a very simple procedure to simply screw the grosse jet valves in place of the triangualr. Joe Curto should have these to sell; they are cheap.
Comment by Patrick McLoad — April 2, 2008 @ 8:50 pm
My kingdom for a Baldor!
Comment by markmcchesney — April 9, 2008 @ 7:28 pm
+1 on the Grosse jet. Got them on my ’65 ots
Comment by markmcchesney — April 9, 2008 @ 7:29 pm
Hello. I have an inherited 1973 R75/5 with about 30k miles. It’s in pretty good shape and I ride it regularly.
I have about $10k and am considering buying a newer bike. But a part of me wants to sink some of that into my /5 and get it looking sweet and riding sweet! I’m curious to get any advice about just what kind of money is involved with re-working all of a bike’s exterior to like new conditions? Same with mechanics including trading out the carbs and/or making other improvements on the original technology. I know this is a question that possibly isn’t answerable except in ballpark figures. If you can possibly at least do that much I would greatly appreciate it. Thanks!
Comment by Paul Paffe — August 15, 2008 @ 11:27 am
Hello Paul! The nitty gritty details you seek are in my blog. I broke down all my expenses somewhere near the end.
What I recall, offhand, for the exterior is how I got a GREAT price on powdercoating (maybe $225 for frame, a dozen bits, and sandblasted hubs?) and paint ($800 IIRC). The wheels were very expensive because of polished stainless re-spoking. I spend MANY hours polishing the rims myself.
Check my blog for all the engine costs. I went with a Boyer ignition to replace the points, EnduraLast charging system, and Mikuni carbs ($375 for the pair with adapter parts, excellent price!). I recall my headlight conversion to H4 bulb was $160-ish (ouch!). I re-painted the headlight bucket myself.
After you find the info in my blog e-mail me if you have any other questions.
My advice, in general, is to NOT sink much money into your R75/5 unless you really really want to keep it forever. You won’t get much, if any, value back if you sell it. And I can’t think of a modern bike, even little 250’s, that isn’t easier to ride, safer, and more reliable! I had a deep psychological (pathological?) reason. In simpler terms, I was (am?) crazy.
Comment by Penforhire — August 15, 2008 @ 11:48 am
Wow,your doing really good job there dude,it amaze me a lot,thanks.
Cheers,
Jaguar XKE Fan
Comment by rosley — December 19, 2008 @ 6:30 am
Hi! I was surfing and found your blog post… nice! I love your blog. 🙂 Cheers! Sandra. R.
Comment by sandrar — September 10, 2009 @ 5:41 am
HI, great pics, impressed by the polishing art, perhaps stupid question, do you know which part you put in the two holes on the bottom of the air balancing manifold? can find any information on these, but I am sure you must have put something in there to get the car running 🙂
Comment by Robert — December 24, 2012 @ 10:16 am
Hello Robert. Maybe someone else will chime in. I don’t have the car but I still have the manuals. Unfortunately none of them detail the air balancer. They show it in place from a top view. I see there is a hose connection on the end and three air connections, one for each carb manifold. But that leaves the two smaller ‘bosses’ on the bottom you are asking about that I don’t recall the function of.
Comment by Penforhire — December 27, 2012 @ 2:01 pm
Robert, They may be for the throttle return springs. I will try to look into it for you.
Penforhire: On a separate note, I am wondering how much progress you have made on the rest of the car as plenty of time has passed since you did the rust remover comparison. You may recall that I supplied the D-Rust-It which is now defunct. I continue to carry Esprit Performance Rust Remover Concentrate and wondered if you would like to do another head to head comparison with any other brand or against Evapo-Rust once again. I’m not sure if anyone really understood the efficacy of using my concentrate to save shipping costs and vary the strength of the mixed fluid. I now have a second website, http://www.rustremoverproducts.com in addition to the original http://www.rustdepot.com.
Let me know if you are interested.
Regards, Lee
Comment by Lee Johnson — January 17, 2013 @ 2:59 pm
Hello Lee, the reason my blog entries are discontinued is that the car resides with my ex-wife. It was originally her father’s so I couldn’t keep it in good conscience after our dissolution. As far as I know, there has been no additional work done to it. I myself SHOULD start another major vehicle project but I have been keeping busy with smaller hobbies, such as brewing beer and hand-loading ammunition (not at the same time, lol).
Comment by Penforhire — January 18, 2013 @ 1:59 pm
Alas, I lost my 63 coupe to financing my ex-wife’s kitchen remodel. It was in need of a complete restoration, but I really miss that car and would like to find another ‘basket case’ to work on, especially now w/ the rust remover (I never had it back then). There are worse hobbies and personally I love beer and target shooting (also not at the same time!), so keep up the good work! Keep in mind thew rust remover will clean brass too. I haven’t used it much on brass, but I know it helps clean it. I now carry 16 oz, 1 quart and 1/2 gallon sizes for a wide range of needs. Check it out at http://www.rustdepot.com. Anyway, it is good to hear from you and I wish you luck in your future endeavors.
Regards, Lee
Comment by Lee Johnson — January 18, 2013 @ 2:44 pm